Note: this tutorial has been written for Ansible Molecule 3 (Releases · ansible-community/molecule · GitHub)
To test your roles or playbooks, you can use VirtualBox or Hyper-V to build new VMs with fresh OS installs. It involves a lot of steps (creating/building a new VM, configuring SSH keys and inventory, run the Ansible playbook, destroy VM). This process can be further enhanced using Vagrant (to provision and destroy VM instances) or Docker, for shorter feedback. However, it can be very cumbersome manually dealing with Vagrant and underlying VMs.
Molecule solves this problem by automating this process and can be seen as an orchestrator: it will take charge of spinning up fresh installs & destroy them after the role/playbook has been executed. Depending on the chosen driver, Molecule will provision instances (delegated) or containers (docker and podman) to test against.
In this tutorial, I will use the docker driver as it's the default one and is often a good choice.
If you are interested in learning more about the delegated driver, here is a good write-up: https://medium.com/@fabio.marinetti81/validate-ansible-roles-through-molecule-delegated-driver-a2ea2ab395b5.
Ansible testing levels
You probably heard of the test pyramid in software development. The test pyramid defines three layers : unit tests, integrations tests and end-to-end tests. Infrastructure as Code (IaC) testing using Ansible tools involves the same concepts:
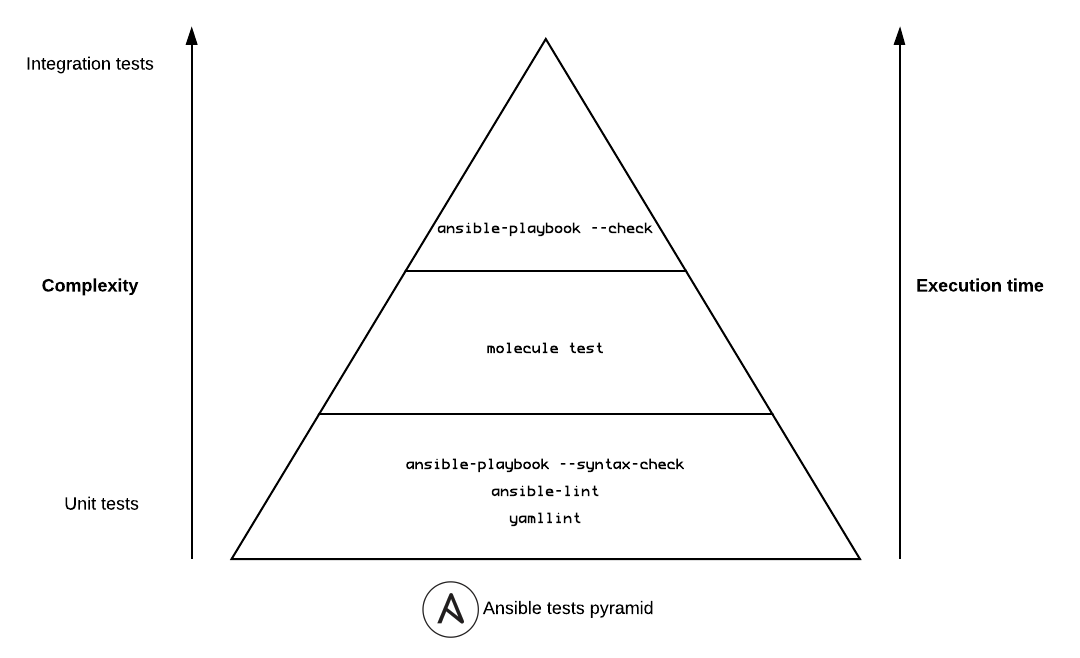
There are multiple levels of testing with Ansible (from bottom to top):
- Unit tests:
- Testing yaml structure:
yamllint - Testing Ansible playbook structure:
ansible-playbook --syntax-check - Check for bad practices:
ansible-lint
- Testing yaml structure:
- Integration tests:
molecule test - End-to-end tests: testing the actual role or playbook against a production environment using Ansible's check mode (Dry Run)
ansible-playbook --check. You can use this mode to check that your role or playbook is idempotent
Notes:
- As
ansible-playbook --syntax-checkis only a static check, more integration tests are needed to ensure that dynamic includes (include_tasks) work as expected - Ansible's dry-run mode will not make any changes on the target system. It will only report what changes would have been made without the check mode.
- Idempotency is the ability to run a task multiple times with the same result (ie. don't run the task again if the target has the desired state).
How it works?
Testing steps
When running tests (molecule test), Molecule goes through a series of steps (the test matrix). Here is a summary:
- dependency: collect required dependencies (roles, collections) using specified dependency manager (in
molecule.yml), Galaxy is the default one - lint: lint project using an external shell command (
ansible-lintis recommended) - cleanup: (using a provided
cleanup.yml, specified inmolecule.yml). This playbook is used to clean up test infrastructure set up in thepreparephase. This step is executed directly before everydestroystep. - destroy: destroy the target instance against which the playbook has been run
- create: create the target instance, using the defined
driverinmolecule.yml - prepare: prepare the instance: install any needed packages for the tested role/playbook
- converge: the actual test, import the role/playbook and run it
- verify: verify that the role/playbook has been correctly imported/executed, using the specified
verifierin themolecule.ymlfile - idempotence: run again the
convergephase, and ensure that the role/playbook is idempotent. Under the hood, Molecule runs the playbook used at theconvergestep and checks for thechangedboolean in the return values, indicating that a task had to make changes and that the idempotency is not guaranteed. The step will fail with errors.
Additionally, each step can be run independently:
molecule <step>
Installing Molecule
Molecule is easy to install:
pip3 install molecule
Note: The Molecule team highly recommends to install it in a Python virtual environment using pyenv.
If you are not very familiar with Python or don't have any valid Python install, I recommend its use through Docker:
docker run --rm -it quay.io/ansible/molecule:3.0.0 molecule --version
It's fair easy and allows you to get started without installing Python, pip, and its various dependencies.
Initializing a new role
Initializing a new role using Molecule is also easy:
molecule init role
Using Docker (Linux):
docker run --rm -it \
    -v "$(pwd)":/molecule/:ro \
    -v /var/run/docker.sock:/var/run/docker.sock \
    -w /molecule/ \
    quay.io/ansible/molecule:3.0.0 \
    molecule init role role.name
On Windows:
docker run --rm -it ^
-v "%cd%":/molecule/:ro ^
-v /var/run/docker.sock:/var/run/docker.sock ^
-w /molecule/ ^
quay.io/ansible/molecule:3.0.0 ^
molecule init role role.name
Ansible's Galaxy users will not be lost as Molecules uses it to generate role layouts. If you are not familiar with Ansible Galaxy, you can review the directory structure here.
Molecule layout
molecule
└── default
    ├── converge.yml
    ├── Dockerfile.j2
    ├── INSTALL.rst
    ├── molecule.yml
    └── verify.yml
The molecule.yml file
The molecule.yml file is particularly important as it is used to configure Molecule.
---
dependency:
  name: galaxy
driver:
  name: docker
platforms:
  - name: instance
    image: docker.io/pycontribs/centos:7
    pre_build_image: true
provisioner:
  name: ansible
verifier:
  name: ansible
lint: |
  set -e
  yamllint .
  ansible-lint
Here are the most important sections:
verifier:
As of Molecule 3.0, Ansible is now the default verifier. It simply is an Ansible playbook where you can write specific state checking tests on the target instance. Optionally, you can use Testinfra if you are familiar with this tool. I prefer sticking with the ansible verifier as I don't want to switch language to write my tests. For the rest of this tutorial, I will assume that the verifier is set to ansible.
platforms:
In this section, you can specify the Docker image used to create the target instance. You can also mount volumes or publish ports. If you want to test against multiple distributions (CentOS, Fedora, Debian), you can use an environment variable:
platforms:
  - name: instance
    image: ${DOCKER_IMAGE_DISTRIBUTION}
    command: ${DOCKER_IMAGE_COMMAND:-""}
    volumes:
      - /sys/fs/cgroup:/sys/fs/cgroup:ro
    published_ports:
      - 0.0.0.0:80:8080
    privileged: true
    pre_build_image: true
lint:
This section is used to specify an external command that Molecule will use to handle project linting.
The converge.yml file
This is where you import your role. It simply is an Ansible playbook that Molecule runs right after the instance creation (setup). Typically, this file will be similar to this:
---
- name: Converge
  hosts: all
  become: true

  pre_tasks:
    - name: Ensure openssh-server is installed.
      package:
        name:
          - openssh-server
        state: present

  roles:
    - role: my-role
The pre_tasks section allows you to prepare the instance before importing your role.
This file can be run independently using this command:
molecule converge
The verify.yml file
Finally, the verify.yml file will contain Ansible instructions to verify that your role has been correctly installed on the instance. This another Ansible playbook is run immediately after the role import (converge.yml file).
For instance, here is a verify.yml file used to check that Nginx is correctly serving web requests:
- name: Verify
  hosts: all

  tasks:
    - name: Verify Nginx is serving web requests
      uri:
        url: http://localhost/
        status_code: 200
Similarly to the converge step, the verify step will run the verify.yml playbook. This command can be used to run it without launching the entire Molecule sequence:
molecule verify
Molecule will run this playbook against the target instance, created earlier.
Typical test workflow
As stated at the beginning of this tutorial, Molecule will go through a long series of steps (the test matrix), listed below by Molecule itself:
--> Test matrix

└── default
    ├── dependency
    ├── lint
    ├── cleanup
    ├── destroy
    ├── syntax
    ├── create
    ├── prepare
    ├── converge
    ├── idempotence
    ├── side_effect
    ├── verify
    ├── cleanup
    └── destroy
This test matrix is similar to the Maven lifecycle, for those who know well Maven (welcome Java developers ;).
As the entire test matrix takes some time to complete, a typical workflow when developing a role or playbook could be:
molecule create: create the target instance.molecule converge: run the actual playbook against the created instance. Additionally, lint your files usingmolecule lint.molecule verify: ensure that the written tests are green.- Bring modifications to your playbook.
- Run again
molecule converge/molecule verifyto test your modifications. - Additionally, if you left the target instance in a broken state, you can destroy it using
molecule destroy, you would then recreate it usingmolecule create. - Run
molecule convergeto test your changes. - Finally, run the entire test cycle
molecule testto ensure your role is correctly working, in particular idempotency.
Note: another way to ensure that your playbook is idempotent would be to run molecule converge twice. However you would have to pay attention to the Ansible tasks return values, and check for changed, as specified in the testing steps section.
Debugging a Molecule test
When your tests are failing, it can be very useful to inspect the created instance to see what's happening inside.
The --destroy=never flag
The --destroy=never flag simply tells Molecule to not destroy the created instance after running the tests, allowing you to inspect it:
molecule test --destroy=never
Using Docker (Linux):
docker run --rm -it \
	-v "$(pwd)":/molecule/:ro \
	-v /var/run/docker.sock:/var/run/docker.sock \
	-v $HOME/.cache/:/root/.cache/ \
	-w /molecule/ \
	quay.io/ansible/molecule:3.0.0 \
	molecule test --destroy=never
On Windows:
docker run --rm -it ^
-v "%cd%":/molecule/:ro ^
-v ~/.cache/:/root/.cache/ ^
-v /var/run/docker.sock:/var/run/docker.sock ^
-w /molecule/ ^
quay.io/ansible/molecule:3.0.0 ^
molecule test --destroy=never
Login into the instance
To inspect the instance state, simply issue this command:
molecule login
This will directly logs you into the Molecule instance used to test your playbook against.
Using Docker (Linux):
docker run --rm -it \
    -v "$(pwd)":/molecule/:ro \
    -v $HOME/.cache/:/root/.cache/ \
    -v /var/run/docker.sock:/var/run/docker.sock \
    -w /molecule/ \
    quay.io/ansible/molecule:3.0.0 \
    molecule login
On Windows:
docker run --rm -it ^
-v "%cd%":/molecule/:ro ^
-v ~/.cache/:/root/.cache/ ^
-v /var/run/docker.sock:/var/run/docker.sock ^
-w /molecule/ ^
quay.io/ansible/molecule:3.0.0 ^
molecule login
Note: If you use Molecule through Docker, you won't be able to log into the target instance, unless you mount the $HOME/.cache host directory into the container, for each Molecule commands involving interactions with the target instance.
ERROR: Instances not created. Please create instances first.
Indeed, Molecule uses this directory to store its state (the Docker container name of the created instance for example).
As the test instance is created using Docker (Docker driver), you can also issue a docker ps command and execute an interactive shell on the container:
docker exec -it <container_id> sh
Testing Ansible playbooks
As the converge.yml file is just an Ansible playbook that is run to execute tests, testing a playbook is quite similar to testing a role. First, issue this command to create a new scenario in your playbook's directory:
molecule init scenario
Then, instead of including a role in the converge.yml file, simply import a playbook:
---
- name: Converge
  hosts: all
  become: true

  pre_tasks:
    - name: Ensure openssh-server is installed.
      package:
        name:
          - openssh-server
        state: present

- import_playbook: ../../playbook.yml
Run the molecule converge command to execute the playbook. You can also use a verify.yml file to ensure your playbook works as expected.
Make sure the target hosts in your playbook match the ones defined in the converge.yml file.
Recommended resources
Books
The must-read book on this topic is obviously Ansible for DevOps by the famous Jeff Geerling, which is also the author of 99 Ansible roles.
Courses
For those who prefer watching screencasts over reading books, here is a great one on Pluralsight, authored by RedHat:
https://app.pluralsight.com/library/courses/ansible-fundamentals/table-of-contents
For an in-depth tutorial, head over this course:
https://app.pluralsight.com/library/courses/getting-started-ansible/table-of-contents
If you don't own a Pluralsight account yet, use this link to get 50% off your first month or 15% off an annual subscription.