Migrating Wordpress to Ghost using Docker

Note: This post has been written for WordPress v. 4.3.9 and Ghost v. 0.11.7
For the last year, my blog was hosted in a WordPress Docker container. I've now migrated my blog to Ghost, still using Docker.
This post explains the reasons that got me to move to Ghost and how I did it.
Why did I move to Ghost?
A complex writing workflow
Writing my posts using plain text then formatting it (using integrated WYSIWYG/html editor) was really painful.
My workflow was the following:
- Writing draft in Evernote
- Formatting post in WordPress WYSIWYG editor
- Formatting code using a plugin
- Fixing it using HTML editor
I really wanted to keep a version of my posts in Evernote or another note tool. Since Evernote didn't recognize either HTML or Markdown syntax, I also switched to Inkdrop. This combination of tools allows me to really simplify my workflow:
- Writing & formatting my post using Markdown (code included)
- Importing my post to Ghost
My experience with WordPress
During this year, I encountered these very commons problems with WordPress:
- I broke my installation after installing a new plugin or updating WordPress version (white screen), I experienced this issue a few times (I was able to recover my blog thanks to UdraftPlus)
- Performance: since I've installed a lot of required plugins, the site was slow and pretty heavy yet it didn't contain a lot of posts
- No Markdown support; I tried many plugins (which consist to convert Markdown to HTML), no one fully satisfied me.
On the other hand, Ghost offers the following advantages for me:
- Built-in Markdown support!
- Serves content very fast
- SEO support without plugin
- A very light and simple blogging system
- Written in Javascript (NodeJS), a well known technology for most developers
- Integrated email service (inside the Docker image)
The migration from WordPress to Ghost
Export WordPress data
Export posts
This part is the easiest as the Ghost team has developed a plugin to simplify the migration from WordPress.
-
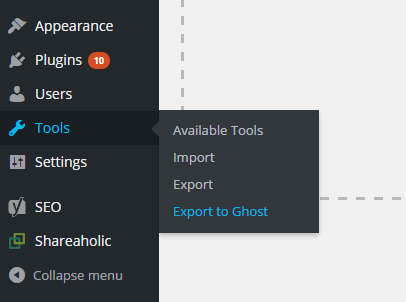
Install and activate the WordPress "Ghost" plugin (https://wordpress.org/plugins/ghost/).
-
Download the Ghost file and export your data (.json):

Export images
WordPress stores its images in the wp-content/uploads directory. Since the WordPress instance is running within a Docker container, we have to find out where this directory is located. If your container's wp-content directory is bound on your host, simply go to this folder and backup its content.
If you haven't, you can guess its location using Docker CLI:
docker inspect --format='{{range .Mounts}}{{.Source}}{{end}}' 02cd84ed3689
Where 02cd84ed3689 is your Wordpress container ID
This command should return the location where the WordPress container is storing its data.
Go to the specified directory and save its content wherever you want.
Export comments
Unfortunately, the only way to export comments to Ghost is using Disqus.
Install the Disqus plugin and go to Comments -> Disqus in the left-side admin panel.
Click on Plugin Settings then click on export comments like shown below:

Your blog comments should now have been exported to Disqus.
Import Wordpress data into Ghost
From now on, I assume you already have an instance of Ghost running on your server. If it isn't the case, you can get started using this simple docker-compose file:
version: '2'
services:
  blog:
    image: ghost:0.11.7
    container_name: ghost
    expose:
     - "2368"
    volumes:
     - "/where/you/want/to/store/ghost/content:/var/lib/ghost"
    restart: always
    environment:
     - VIRTUAL_HOST=blog.yourdomain.com,www.blog.yourdomain.com
     - NODE_ENV=production
     - PUBLIC_URL=https://blog.yourdomain.com
Note that this container doesn't listen to port 80 as I'm using an nginx-proxy container (https://github.com/jwilder/nginx-proxy).
Import posts
Before importing posts, you need to update images links because Wordpress stores images in the wp-content/uploads directory whereas Ghost stores them in content/images.
To make the links compatible with Ghost, we can use this script:
sed -i.original -e 's|wp-content\\/uploads|content\\/images|g' ${your-export.json}
This command should create a backup file and replace wp-content/uploads by content/images in the json file.
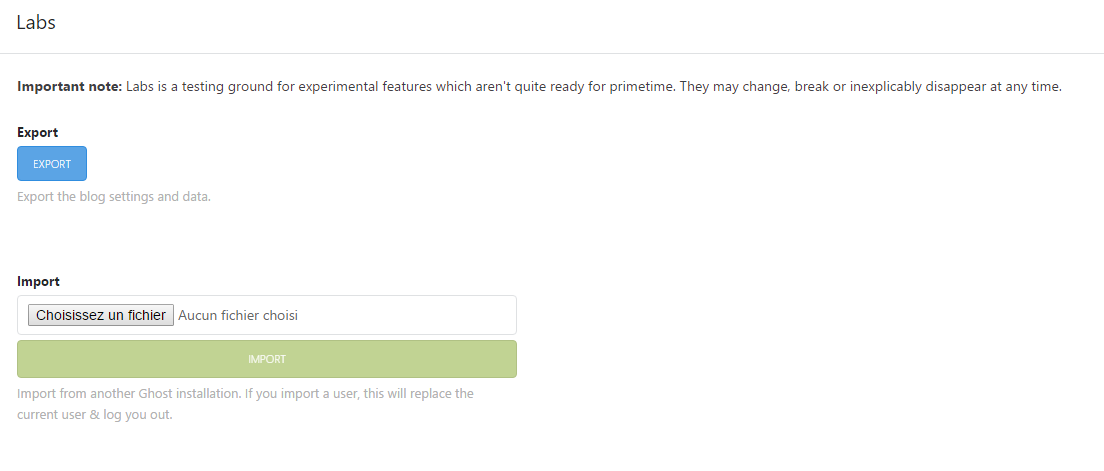
The json file is now ready to be imported. This is the easiest part, as Ghost integrates a function to import json data.
To do so, simply go to your blog admin panel, click on Labs and then select the json file generated by the WordPress has generated.

Import images
Ghost stores its images in the /var/lib/ghost/images directory in the container. Depending on where you bound this directory on the host
Simply copy theses files to this location.
You can find the container mounts using the Docker CLI:
docker inspect --format='{{json .Mounts}}' 3053659ae689
Where 3053659ae689 is your Ghost container ID.
Find the mount where Destination is /var/lib/ghost. The Source/images directory is where you have to copy the WordPress medias you exported.
Import comments
As your comments are now kept safe in Disqus, the import process consists in adding a simple javascript snippet that will retrieve these comments.
Add Disqus plugin to Ghost
Depending on the active theme in your Ghost installation, a Disqus module may be already present.
If not, you can set up Disqus using this guide: https://disqus.com/profile/signup/intent/.
If you are using the Ghostium theme https://github.com/oswaldoacauan/ghostium, the Disqus module is already installed, all you have to do is to put your Disqus shortname in the src/partials/custom/config.hbs file.
Handling SEO
When changing your CMS system, you should also think about the impacts it will have on SEO. Leaving 404 errors can impact negatively your search ranking.
From WordPress categories to Ghost tags
Ghost doesn't make use of categories. Instead, Ghost relies on tags, which is essentially the same concept. In our use case, if a user tries to access an old page /category/java, the Ghost server will by default return a 404. Instead, it would be much better to tell the navigator (hence the user) this content has moved.
The best way to tell search engines or users that your content has moved is to return a 301 HTTP code (permanent redirect).
Using NGinx to redirect categories to tags
I found that the best method to set up a permanent redirect was to configure NGinx.
I've set up the following redirections within NGinx:
rewrite ^\/category\/(.*) https://blog.florianlopes.io/tag/$1/ permanent;
This line tells NGinx to respond with a redirection to /tag/* when the URL /category/* is reached.
/sitemap_index.xml -> sitemap.xml
rewrite ^\/sitemap_index.xml https://blog.florianlopes.io/sitemap.xml permanent;
/post_tag-sitemap.xml -> sitemap-tags.xml
rewrite ^\/post_tag-sitemap.xml https://blog.florianlopes.io/sitemap-tags.xml permanent;
Custom redirection with jwilder/nginx-proxy
If you are using nginx-proxy from Jason Wilder, simply put a file named ${VIRTUAL_HOST}_location containing these directives:
rewrite ^\/category\/(.*) https://blog.florianlopes.io/tag/$1/ permanent;
rewrite ^\/sitemap_index.xml https://blog.florianlopes.io/sitemap.xml permanent;
rewrite ^\/post_tag-sitemap.xml https://blog.florianlopes.io/sitemap-tags.xml permanent;
Given your virtual host is named yourblog.com, put these directives in a yourblog.com_location file.
Last step, share this file with the nginx-proxy Docker container:
docker run -d -p 80:80 -p 443:443 -v /path/to/vhost:/etc/nginx/vhost.d:ro -v /var/run/docker.sock:/tmp/docker.sock:ro jwilder/nginx-proxy
Some resources for Ghost
https://www.ghostforbeginners.com/
https://help.ghost.org/hc/en-us/articles/225093168-Migrating-From-WordPress-to-Ghost
My note-taking app.